Past Blog Posts:
October Guest Designer, Kriss Cramer
Filed under Alice in Wonderland, Art Projects, Guest Designers, Tutorials
Kriss has been so kind to provide tutorials for the projects she has created for Alpha Stamps. This month have fun with the Alice in Wonderland lunch box! Additional tutorials from Kriss Cramer will be posted in upcoming newsletters.
In my search to find something new and different, I came across Alpha Stamps. I was immediately intrigued by their unique offerings of stamps. For over the past 10 years I have been stamping and my style has changed and evolved. I was thrilled to find Alpha Stamps, not only for their stamps, but for their beautiful collection of collage sheets.
Currently I am an independent instructor teaching classes in rubber stamping, scrapbooking, card making, book making, and altered arts. I am also a certified educator for Ranger Industries in Ink, Embossing and Perfect Pearls, as well as a certified trainer for Fiskars. In the past I have participated on several design teams with the most recent one being Ranger Industries. I also regularly submit my work to paper crafting magazines and it has been published in Crafts ‘N Things, Stampers Sampler, Stamp It!, RubberStampMadness, Vamp Stamp News, Card Maker, and Scrap ‘N Stamp.
I live in East Fallowfield, Pennsylvania with my husband, Bill, and son, Levi.
Alice in Wonderland Altered Lunch Box
by Kriss Cramer
- Collage Sheets from Alice in Wonderland Collection
- Stamps, Alice Tea Party
- Card Suits Pattern Paper
- Brushed Metallic Spray Paint, Champagne, Krylon
- Archival Ink Pad, Jet Black, Ranger Industries
- Distress Ink Pads, Fired Brick, Peeled Paint and Spiced Marmalade, Ranger Industries
- Mini Misters, Ranger Industries
- Non-Stick Craft Sheet, Ranger Industries
- Heatit Craft Tool. Ranger Industries
- Inkessentials Paper Accents, Glossy and Crackle, Ranger Industries
- Adirondack Ink Pad, Cranberry, Ranger Industries
- Small Brayer, Ranger Industries
- Scallop Circle Die, Spellbinders
- 1-1/4″ Square Punch, EK Success
- Chipboard Letters, Monica, Zsiage
- Gel Medium, Liquitex
- Gorilla Glue, Gorilla Glue
- Spoon, Old Book Pages, Black Rick Rack Ribbon, Black and Red Cardstock
Instructions:
1. Glue spoon to lunch box handle with Gorilla Glue. Paint lunch box and spoon with Brushed Metallic Spray Paint.
2. Rub one of the Distress Ink Pad onto a non-stick craft sheet. Spitz ink with water until bubbly. Lay book page into ink, lift up, and dry with heat tool. Repeat process to build layers of color until you like the end result. Do the same for the next two colors. Stamp pages with images from Alice Tea Party stamp set and black ink.
3. Using a 1-1/4″ punch, punch out collage images, stamped book pages, and black cardstock. Ink all the edges with black ink.
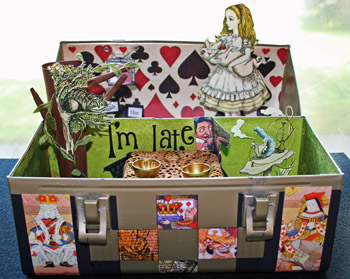
4. Apply pattern paper, 1-1/4″ squares in a checker board pattern, black cardstock and additional clip art to lunch box with gel medium. Cover two of the clovers of the pattern paper with Glossy Accents. Trim edge of pattern paper with black rick rack ribbon.
5. Brayer Cranberry ink on chipboard letters, dry with heat tool, and cover with Crackle Accents. Once dry, attach to lunch box.
6. For sides, emboss “Eat Me” and “Drink Me” on two 3/4″ x 2″ pieces of black cardstock and insert in slots. Cut playing card symbols from pattern paper, attach to scalloped edge circle, and to black cardstock background. Cover symbols with Glossy Accents and once dry, attach to box.
Part 2 — Inside
- Collage Sheets from Alice in Wonderland Collection
- Alice In Wonderland Paper Doll Set
- Pattern Paper
- Inchie Frame Clear Stamps
- Leaf Ribbon
- Brushed Metallic Spray Paint, Champagne Nouveau (51253), Krylon
- Spray Gesso (7015), Krylon
- Premium Gold Foil Spray (1050), Krylon
- Distress Ink Pads, Vintage Photo, Ranger Industries
- Mini Misters, Ranger Industries
- Non-Stick Craft Sheet, Ranger Industries
- Inessentials Glossy Accents, Ranger Industries
- Ultra Thick Embossing Enamel, Bronze, Ranger Industries
- Gel Medium, Liquitex
- Cuttlebug Alphabet Dies and Machine, Provo Craft
- Model Magic, Crayola
- Black, White, and Brown Cardstock; Green Pattern Paper; Fabric; 1″ Square Mirror; Silver Wire; Plastic Tea Cups
Instructions:
1. Paint inside of lunch box with Brushed Metallic Spray Paint.
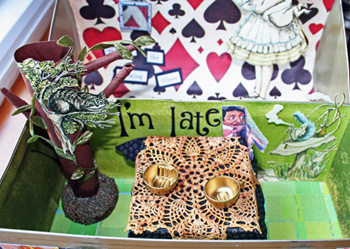
2. Cut pattern paper (card suits) to fit the inside of the lid. Make a slit in paper to insert a strip of heavy weight cardstock. You will use this to mount Alice to once the paper is glued into the lid. Cover inside bottom with various green pattern papers.
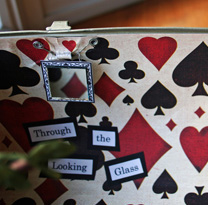
 3. Cut out Alice and mount to cardstock strip. Computer generate and print “Through the Looking Glass,” trim each word, and mount to black cardstock panels. Add to lid. Use clear Inchie Frame Stamp and attach it heavy weight white cardstock and trim to size. Make wire hangers and attach to back of frame. Cut an additional white cardstock square the same size and attach to back of frame (to cover wire hangers). Use Glossy Accents and attach 1″ mirror to center of frame. Make a wire hanger and insert into lunch box (where original wire hung for a thermos) making sure to catch the mirror’s hangers.
4. Tree — The tree was made with brown cardstock by rolling different sizes to create the trunk and branches. Add green leaf ribbon and Cheshire cat from Paper Doll collection. Make a base for the tree with Model Magic or Air-Dry Clay and press the tree trunk into it. Let it dry and paint it with brown paint. To create the “dirt”, mix Brown Ultra Thick Embossing Enamel and Glossy Accents and press it onto the base. Attach tree to lunch box with gel medium.
 5. Table — The table top is made from a recycled clamshell box and the legs are made from rolled black cardstock. It is covered with a piece of black and tan fabric, and a white dollie that was stained with Vintage Photo Distress Ink. Rub Distress Ink directly onto dollie and spritz with water and roll up in your hands to distribute ink. Flatten out and dry with heat tool. Add to table with gel medium. The cups are plastic from a child’s Dollar Store toy, sprayed with Gesso and then with Gold Foil spray. The cups and the collage cut out were also attached with gel medium.
6. “I’m late” was cut out of black cardstock with Cuttlebug dies, and the caterpillar is one of the Paper Doll cut outs. The smoke was cut out separately and attached with a dimensional backing.
To see more of Kriss Cramer’s beautiful work please visit the Gallery.


Yesterday I posted an entry on my blog with a link to this tutorial. Would you let me know if that’s OK?
Thanks,
Nancy Ward
http://paperfriendly.blogspot.com
Hi Nancy,
Sure! btw, I edited the address of your blog (it had a “z” instead of an “a” in paper). Nice blog – good links to free stuff around the Web.
thanks,
Leslie
[…] Alpha Stamps News October Guest Designer Kriss Cramer Posted by root 4 days ago (http://www.alphastamps.com) Oct 4 2008 ranger industries inkessentials paper accents glossy and crackle ranger industries adirondack ink pad cranberry table the table top is made from a recycled clamshell box and the legs are made you must be logged in to post a comment copyright al Discuss | Bury | News | Alpha Stamps News October Guest Designer Kriss Cramer […]
Thank you very much, because you are sharing some information about this good post . Buy essay or written essays if you are willing get know more!
yes! over in the right column are links to both. the FB pg is:
http://www.facebook.com/AlphaStampsCollage
thanks,
Leslie