Past Blog Posts:
Spoon Pendant Tutorial by Lynn Stevens
Filed under Art Projects, Bella's Corner, Jewelry, Tutorials
Note: most of the links on this post no longer work, as we moved to a new Web site in 2018. But you can try searching on the same names (as links below) on the new site.
 The very fabulous and talented Lynn Stevens shows us how easy it is to make a beautiful pendant out of a spoon and a blow torch. Yes, a blow torch!
Take the torch, along with bits, baubles, collage images, and of course a spoon. If you follow along you will have yourself quite the pretty pendant! (Ooohhh, could this become my next obsession along with soldering?!)
If you’ve been wondering about torch work then this is the perfect project to work with to satisfy your curiosity.
However! Being the bad influence that I am my Poppets, I can not be responsible for anything else that you may decide to torch, possibly catch on fire or melt to make art and jewelry with!
Safety
– Work in an area that’s safe.
– This is not for children. We are working with flame and heat up to 1000%! (Unless they’re naughty children!)
– Keep fingers and hands away from heat.
– Wear safety glasses when using a cutting wheel.
Now, let’s get started!
 Supplies
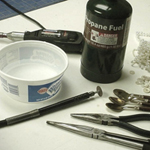
– Small spoon
– Bernzomatic hand-held torch or propane torch or jeweler’s torch
– Torch tip for the heat source
– Two long handled needle nose pliers
– Container of cool water
– Dremel tool with cutting wheel or jeweler’s saw or small saw for cutting off end
– Steel wool.
Directions
 Begin by holding your spoon with pliers over the blue flame of heat source. Depending on what your spoon is made of i.e., silver, gold plate, or stainless steel, will vary the heating time. I usually start with 20 to 30 seconds.

 Remove from heat and with both pliers begin to bend spoon approximately 1/2″ from spoon area. If it does not bend easily, place back in flame. Continue to heat and bend until spoon almost touches along back.
 When the spoon is bent all the way back, place in a container of water. This is called ‘quenching’ and will cool it instantly for handling.

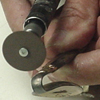
 The next step requires a cut off wheel on a Dremel or a jeweler’s saw or any small hand-held saw. Cut off the excess end of spoon. Be sure to wear eye protection if you are using a cut-off wheel!

 Now place the spoon back in flame, holding with pliers. Remove from heat and continue to bend all the way over. Quench again before handling.
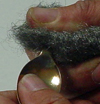
 You can clean any discoloration with steel wool, just gently buff area clean.
Now the FUN begins, decide what you want to place in your spoon! Note: If you are adding an image to a gem [clear cabochon]: Add a small amount of Diamond Glaze to the back of your clear gem, set on top of your image. Let dry and cut out close to edge. You can attach your gem with Diamond Glaze or E-6000. Drill holes with a Dremel tool and small bit for jump rings. Add charms and embellishments to finish off your pieces!
Additional Supplies (and Pendants)
 Marie Spoon Pendant with Aqua Drop Bead
– 25×18 French Ovals Collage Sheet
– Glass Teardrops (Aqua)
– Filigree Cone Bead Cap
– Crown Connector
– 6mm Filigree Chain
– Light Aqua AB 10 mm Faceted Beads
– Pearls Mixes in Tins (Copper)
– 25x18mm Clear Cabochons
– Diamond Glaze
 Marie Spoon Pendant w/Eiffel Tower
– Paris Pendants Collage Sheet
– 25×18 mm French Ovals Collage Sheet
– Gold Fleur de Lys Charm
– 2 Ornate Drops (Raw Brass)
– Baroque Scroll with Loop
– Diamond Glaze
– Florentine Brass Leaves
– Fairy Inchies Mini Collage Sheet
– Glass Teardrop
– Tiny Brass Clam Shells
– Tiny Brass Sea Horses
– Pronged Seahorse
– Baroque Scroll with Loop
– Tiny Real Sea Shells in Tin
– Diamond Glaze
– 25×18 French Ovals Collage Sheet
– Small Fleur Drops
– Pewter Eiffel Tower Charm
– 25x18mm Clear Cabochons
– Diamond Glaze
– 40×30 mm French Ovals Collage Sheet
– Silver Filigree Fans
– Resin On Sale!
– Large Pewter Crown
A pretty easy way to make some pretty pendants, wouldn’t you say? If you try your hand at making spoon pendants, please email pictures to me and I’ll put them up on the Alpha Stamps blog! Have fun!


